Documentation
Getting started
- 1Create a projectGive your application name (and optionally the env name) and we'll generate an update URL for you.
- 2Generate an API key 🔐Generate a unique key that allows you to securely deploy your apps, and save it somewhere safe. You can manage your keys from the "Settings" page.
- 3Configure your application
Follow the instructions then run
OTAGO_API_KEY=[api_key] npx otago doctor --project [project_ref]to check your configuration. - 4
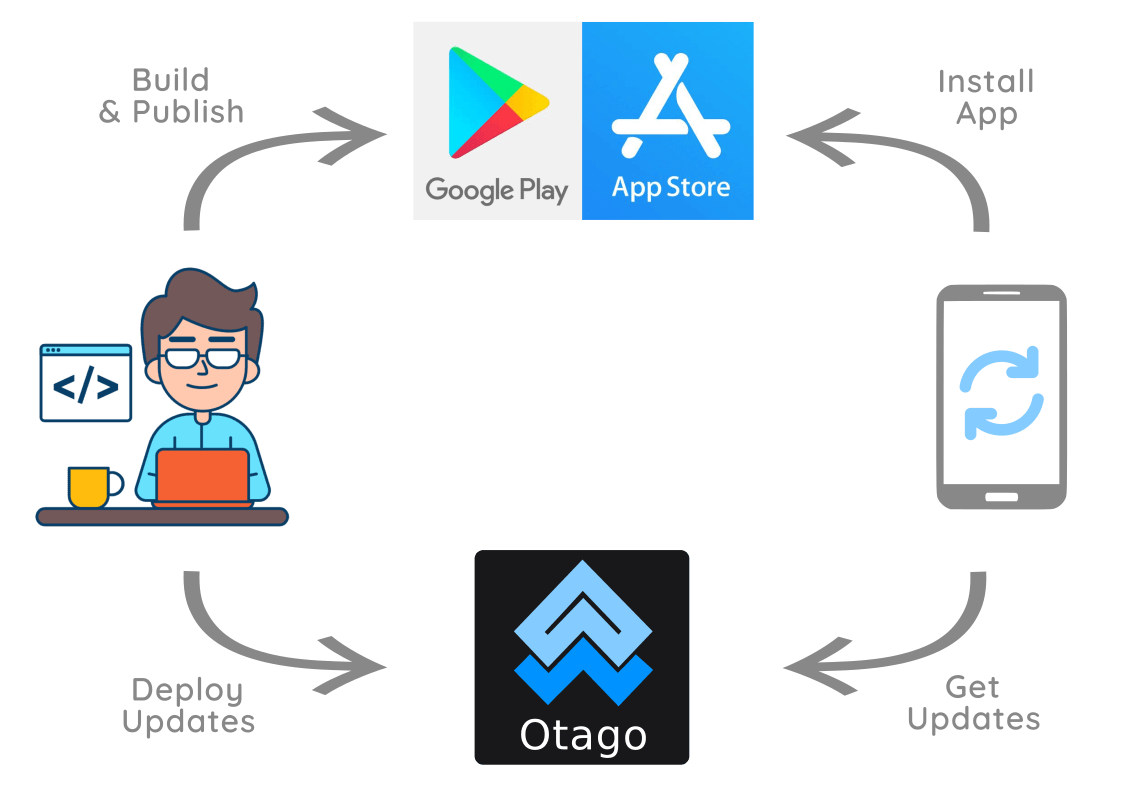
Build & Publish
Use your usual way of building your app (with all the necessary environment variables) and distribute it (either share a development version or publish it on app stores).
- 5
Run your first code push 🚀
Run
OTAGO_API_KEY=[api_key] npx otago deploy --project [project_ref]
Overview
Otago is a custom server for expo-updates library. When the SDK is installed on your mobile application, each time a user starts the app, it will check on Otago for updates. If there is a new version, it is downloaded and installed.

- ✓ Can be updated: Javascript code, images, fonts...
- ✗ Cannot be updated: Native code, app config, libraries that import native code...
Architecture
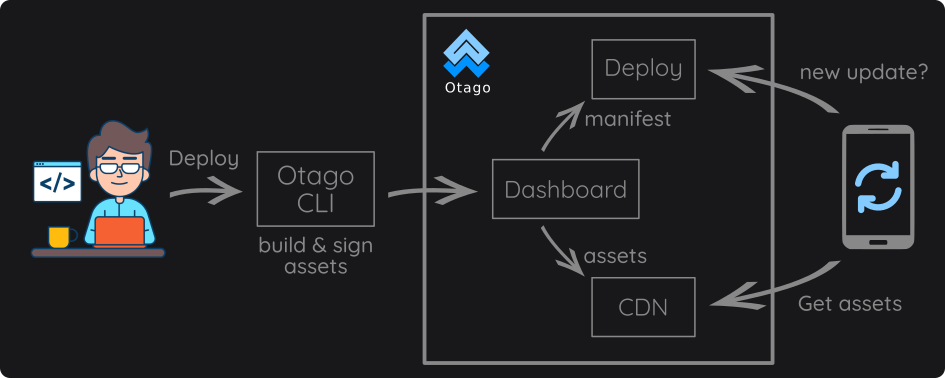
Otago is composed of 4 main parts:
- CLI: to help you bundle and sign your update, then send the assets.
- Dashboard: manage your apps, settings, and billing.
- Deploy: a light replicable service to serve your manifests.
- CDN: serves your assets (currently Cloudflare R2).

How to?
How to configure?
Otago implements the open source
Expo Update protocol
The easiest way to allow your app to download and manage remote updates served by Otago is to add the expo-updates module to your React Native project. 1. Install expo-updates module:
npx expo install expo-updates2. Set runtime version and update URL:
# app.json or app.config.js{ "expo": { "runtimeVersion": { policy: "appVersion" }, "updates": { "url": "[Otago deploy URL]", }, ... }}3. Check your configuration:
OTAGO_API_KEY=[api_key] npx otago doctor --project [project_ref]🎉 Congratulations, you're now ready to build and publish your application!
Extra options:
- checkAutomatically: by default, the app will check for updates every time it is loaded. Set this to ON_ERROR_RECOVERY to disable automatic checking unless recovering from an error. Set this to NEVER to completely disable automatic checking. Must be one of ON_LOAD (default value), ON_ERROR_RECOVERY, WIFI_ONLY, or NEVER.
- fallbackToCacheTimeout: how long (in ms) to allow for fetching OTA updates before falling back to a cached version of the app. Defaults to 0. Must be between 0 and 300000 (5 minutes).
See reference
How to handle envs?
It's important to pass the right environment variables when:
- Building your app
- Calling Otago doctor
- Deploying an update
1. Envs automatic loading:
By default, Otago CLI will load:
- All your
.envfiles withNODE_ENV=production. Seeoverride order - All env variables in your
eas.jsonwithEAS_PROFILE=production(lower priority)
You can override
NODE_ENV and EAS_PROFILE with the values of your choice. You can also disable this automatic loading with
OTAGO_LOAD_ENVS=false and inline or export all the variables you need. 2. Multiple deployment envs:
If you have multiple versions of your app (preview, staging, production... except development because it makes little sens to update it with Otago) and you want to be able to push different code updates to each of them, all you need to do is build them with a different Otago update URL.
# app.config.js (dynamic config){ "expo": { "updates": { "url": "...", "url": process.env.OTAGO_UPDATE_URL, }, ... Then remember to pass the right
OTAGO_UPDATE_URL=... when you build your app. # eas.json{ "build": { "preview": { ... "env": { "OTAGO_UPDATE_URL": "..." } }, "production": { ... "env": { "OTAGO_UPDATE_URL": "..." } }, ...How to sign deployments?
The signatures are verified on the client before the updates are applied. We highly recommend signing code updates, to ensure no one can tamper with your updates.
1. Generate a private key:
npx expo-updates codesigning:generate \ --key-output-directory keys \ --certificate-output-directory certs \ --certificate-validity-duration-years 20 \ --certificate-common-name "My App" Important: do NOT commit the content of the
keys folder, it contains your private key, which should be kept secret. 2. Configure your app's builds to use code signing:
npx expo-updates codesigning:configure \ --certificate-input-directory certs \ --key-input-directory keys3. Re-build and publish your app.
Important: you need to increment your runtime version when you add (or remove) code signing.
4. Pass the private key when you deploy an update:
OTAGO_PRIVATE_KEY=keys/private-key.pem npx otago deploy (...)How to deploy?
- ✓ Can be updated: Javascript code, images, fonts...
- ✗ Cannot be updated: Native code, app config, libraries that import native code...
⚠ Important: your updates always need to be compatible with your app runtime version!
1. Check runtime version:
If you install or upgrade a lib which includes some native code or configuration, you cannot push it as a code update with Otago. Instead you need to increment runtime version (this is automatic with
fingerprint policy), then build and publish a new version of your app. 2. Run deployment:
OTAGO_API_KEY=[api_key] npx otago deploy --project [project_ref]